APPROVE Website Integration
The APPROVE Website Integration enables you to provide the ability for your customers and prospects to apply for financing right from your website.
This page covers everything you need to integrate APPROVE into your website including:
| Topic | Description | Details |
|---|---|---|
| Integration Types | APPROVE provides two types of user experience for completing a finance application; a Hosted Application and an Embedded Application. | Details |
| Tags | APPROVE provides several tags that allow for seamless integration into your eCatalog. These include Teaser Rate tags for displaying estimated monthly payments, Button tags for creating "Apply for Financing" buttons, and Hide tags for hiding the financing functions on specific product pages | Details |
| Installing APPROVE Plugin | Provides step-by-step instructions on how to install the APPROVE Plugin into your website | Details |
| Platform Integrations | In addition to our standard APPROVE Plug-In, we also provide several standard platform integrations for some of the leading ecommerce platforms including WordPress, WooCommerce, Big Commerce, Shopify, and Wix | Details |
APPROVE Integration Types
APPROVE provides two types of user experience for completing a finance application:
Embedded Slide-Out Application
The APPROVE Embedded Slide-Out Application provides your customers a finance application experience without leaving your website via a slide-out that overlays on your product and shopping cart pages.

To enable this feature you will need to first install the APPROVE Plug-in. Once installed use the approve-function="embedded_app" when implementing your APPROVE Buttons.
To customize the fonts and colors to match your website, login to your account and go to APPROVE Settings > Web Integration > Embedded Slide-Out.
{warning} The Embedded Slide-Out is not available on all platforms. See Common Platforms for a list of platforms that currently support this feature.
Hosted Application
The APPROVE hosted application provides your customers a finance application experience hosted on a dedicated micro-site.

Common use cases for the hosted application include:
- If you would like to keep the financing user experience seperate from your website shopping experience
- If you would like to provide links directly to the financing application from an email or electronic document (e.g. PDF Quote)
- If your website platform does not allow implementation of our embedded slide-out (See Common Platforms for details)
To customize the fonts, colors, and logo to match your website, login to your account and go to APPROVE Settings > Web Integration > Hosted Application.
There are two ways you can leverage the Hosted Application:
Via the APPROVE Plug-in
To enable this feature you will need to first install the APPROVE Plug-in. Once installed use the approve-function="hosted_app" when implementing your APPROVE Buttons.
Via a Static URL
You can also send users to a URL to access the hosted application. The basic url structure is:
You can retrieve your hosted application URL by logging into your account in APPROVE Settings > Web Integration > Hosted Application.
You can add products to a lease application by passing the required product information in the URL. The url structure for this is:
If you would like to add mulitple products into a financing application using a url you can do so as follows:
Review the Property Values Defined section for imformation on formatting [model], [price],[quantity], and [shipping].
APPROVE Tags
APPROVE provides several tags that allow for seamless integration into your eCatalog. These include:
| Tag | Description | Details |
|---|---|---|
| Teaser Rate | Allows you to send APPROVE a dollar amount (equipment sale price) and return financing teaser rates for displaying estimated monthly payments | Details |
| Button | Allows you to create "Apply for Financing" buttons that send product information to an APPROVE lease application | Details |
| Hide | Allows you to hide all APPROVE functions on specific product pages either manually or based on some logic | Details |
Teaser Rate tags
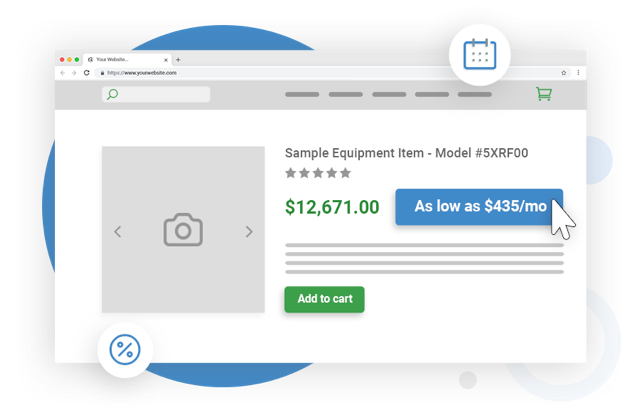
The teaser rate tag allows you to pass pricing information to APPROVE and receive a teaser rate ("As low as $254/mo") to be placed anywhere on your website.
Input
<span
  approve-function="teaser_rate"
  approve-total="10000.00"
></span>
Output
This tag allows you to easily integrate teaser rates anywhere you want on a webpage. Some common examples:
Input
As low as <span
  approve-function="teaser_rate"
  approve-total="10000.00"
></span>/month. Click to Apply
Output
Button tags
APPROVE button tags enable you to create buttons on your website that interact with your APPROVE Finance Application. These tags can be placed in any button giving you complete control over button location and styling.
Button Tag Overview
<button
  type="button"
  approve-function="[application_type]"
  approve-action="[action_type]"
  approve-model="[model]"
  approve-qty="[quantity]"
  approve-price="[price]"
  approve-item-type="[type]"
>Apply For Financing</button>
Tag Properties Defined
| Tag Properties | Description |
|---|---|
approve-function |
Defines the APPROVE function associated with the button |
approve-action |
Defines the APPROVE action taken when user activates button |
approve-model |
Used with add_to_app to add product model information into finance application |
approve-qty |
Used with add_to_app to add quantity information into finance application |
approve-price |
Used with add_to_app to add price information into finance application |
approve-item-type |
Used with add_to_app to add product type information into finance application |
Property Values Defined
| Property Values | Options/Format |
|---|---|
[application-type] |
embedded_app - Will enable the embedded application function hosted_app - Will enable the hosted application function |
[action-type] |
add_to_app - Adds product information to applicationopen_app - Opens embedded application on webpage close_app - Closes embedded application on webpage clear_items - Removes all product information from application |
[model] |
Ideal format is "Make + Model + Name" (e.g. Ford F100 White Truck w/ Extended Cab). This is most commonly found in whatever data field populates the title tag and/or H1 tag on a product page. |
[quantity] |
Integer (e.g. 2) |
[price] |
Float (e.g. 10000.99). Supports USD currency only. |
[type] |
Values supported include new_product, used_product, refurbished_product, service, fee, shipping, or discount |
{info} Lease applications should not include any taxes. Tax is calculated between you and the the final lender and will be addressed at the end of the lending process.
Example Button with Teaser Rate Tag
The example below demonstrates a button that would add a New white Ford F150 Truck for $30,000 to an embedded application. The button also includes the approve-function="teaser_rate" tag so the button can show the potential monthly rate.
<button
  type="button"
  approve-function="embedded_app"
  approve-action="add_to_app"
  approve-model="Ford F150 White Truck"
  approve-qty="1"
  approve-price="30000.00"
  approve-item-type="new_product"
>
As low as <span
  approve-function="teaser_rate"
  approve-total="30000.00"
></span>/month. Click to Apply For Financing</button>
Hide Tag
The <approve-hide/> provides the ability to hide all APPROVE functions on a specific page and/or set of pages. Common use cases for leveraging the <approve-hide/> are:
- To hide the ability to finance below a certain dollar value
- To hide the ability to finance for certain types of products (e.g. training)
- To hide the ability to finance for products in a certain section of your website (e.g. "Accessories)
The tag can be added manually or programmically depending on the use case. There are two steps to leveraging the <approve-hide/> tag:
1. Add the approve-container property to all APPROVE elements on the page:
First add the approve-container property into any <div> and/or <span> that includes APPROVE tags.
In the example below we've added the approve-container property to a set of text with a teaser rate.
<div approve-container>
As low as <span
  approve-function="teaser_rate"
  approve-total="10000.00"
></span>/month. Click to Apply
</div>
2. Add the tag on any page you wish to not show APPROVE elements.
Once you have added the approve-container property to all APPROVE tags within the website, simply add the <approve-hide/> tag to any page you wish to hide all APPROVE elements.
<approve-hide/>
If you only wish to hide APPROVE on a small number of product pages, you can add the <approve-hide/> tag manually in your CMS.
If however you have a large product catalog and/or more complex use cases, you can add the <approve-hide/> tag programmatically. The example below shows how you would add <approve-hide/> to all product pages where the value is <= $2,000 in php.
<?php if($value<=2000>) {>
    <approve-hide/>
<?php }>
Installing the APPROVE Plug-In
Below are step-by-step instructions for adding APPROVE to your website. If you are using WordPress, WooCommerce, Big Commerce, Shopify, and Wix |Details| skip this section and go to the specific platform integration section for instructions.
Step 1: Install the APPROVE Plugin
The APPROVE Plugin is the code that enables APPROVE to function throughout the website.
Example APPROVE Plugin Code
<script> window.kwipped_approve = window.kwipped_approve || {}; window.kwipped_approve.url = "https://www.kwipped.com";
window.kwipped_approve.approve_id = "your+approve+id+goes+here"; </script>
<script src="https://api.kwipped.com/approve/plugin/2.0/approve_plugin_loader.php"></script>
<approve-widget></approve-widget>- This code should be placed in your website's
<body></body>tag. - To retrieve your
approveid, login to your account and go to APPROVE Settings > Web Integration > General.
Step 2: Style You Hosted and/or Embedded Applications
- If you are using the Hosted Application, login to your account and go to APPROVE Settings > Web Integration > Hosted Application to customize the logo, colors, and fonts.
- If you are using the Embedded Application, login to your account and go to APPROVE Settings > Web Integration > Embedded Application to customize the colors and fonts.
Step 3: Configure Your APPROVE Plugin
There are several additional account level settings found at APPROVE Settings > Web Integration > General. These include:
- Auto Submission - When checked, finance applications will be automatically submitted to the Approve Lender Marketplace. If you uncheck, you will be able to review the applications first and submit them manually.*
- Hide Item Prices - When checked, the items added to the cart will not show the prices or totals. The estimated per month will still be shown.
-
Hide Finance Teaser Rate - When checked, the estimated per month finance teaser amount will not show.
*{warning} Note Regarding Auto Submission: You should only use Auto Submission if pricing information on your website is accurate and the product is available. Once applications are submitted to the lender network you can not change the primary equipment listed nor the pricing.
Step 4: Add "Apply for Financing" Button tags
Next step is to implement buttons on your product pages and shopping cart that offer a financing option for your customers and prospects. Review APPROVE Button tags for a detailed instructions on how to structure and implement approve button tags.
Step 5 (Optional): Add "As Low As" Teaser Rate tags
You may also want to provide "As Low As" Teaser Rates on your product pages and shopping cart that offer customers and prospects a sense of what it could cost per month to finance the purchase. To do so review Teaser Rate tags.
Step 6 (Optional): Add Hide Tags to any products you don't want to Offer Financing
You may want to not offer financing options for certain products. To do so review Hide tags.
Common Platform Integrations
In addition to our standard APPROVE Plug-In, we've developed additional plug-ins and/or specific integration instructions for some of the worlds leading ecommerce platforms including:
| Platform | Platform Support | Description | Details |
|---|---|---|---|
| APPROVE WordPress Plug-in | A standard WordPress plugin that enables all the core features and functions of APPROVE | Details | |
| APPROVE WordPress Developer Tools | A WordPress plug-in that provides front-end and back-end libraries that provide access to APPROVE information so you can build your own custom solution | Details | |
| APPROVE WooCommerce Plug-in | An additional WordPress plug-in designed to provide easy integration into your WooCommerce e-commerce catalog | Details | |
| APPROVE Shopify Plug-in | A standard Shopify plugin that enables all the core features and functions of APPROVE | Details | |
| APPROVE BigCommerce TBD | TBD | Details | |
| APPROVE for Wix | Instructions on how to leverage the APPROVE Hosted Application for Wix websites | Details |
Given variation in function and architecture from platform to platform, both the technical level of and available APPROVE features vary.