APPROVE Website Integration
The APPROVE Website Integration enables you to provide your customers and prospects equipment financing options without ever leaving your website.
APPROVE customers have two options for how to get financing options integrated on your website:
| Options | Description | Details |
|---|---|---|
| We Install APPROVE | Install one simple code on your website and let the APPROVE team manage the rest without having to touch your code. | Details |
| You Install APPROVE | If you have a developer and want complete control over how APPROVE in implemented on your website | Details |
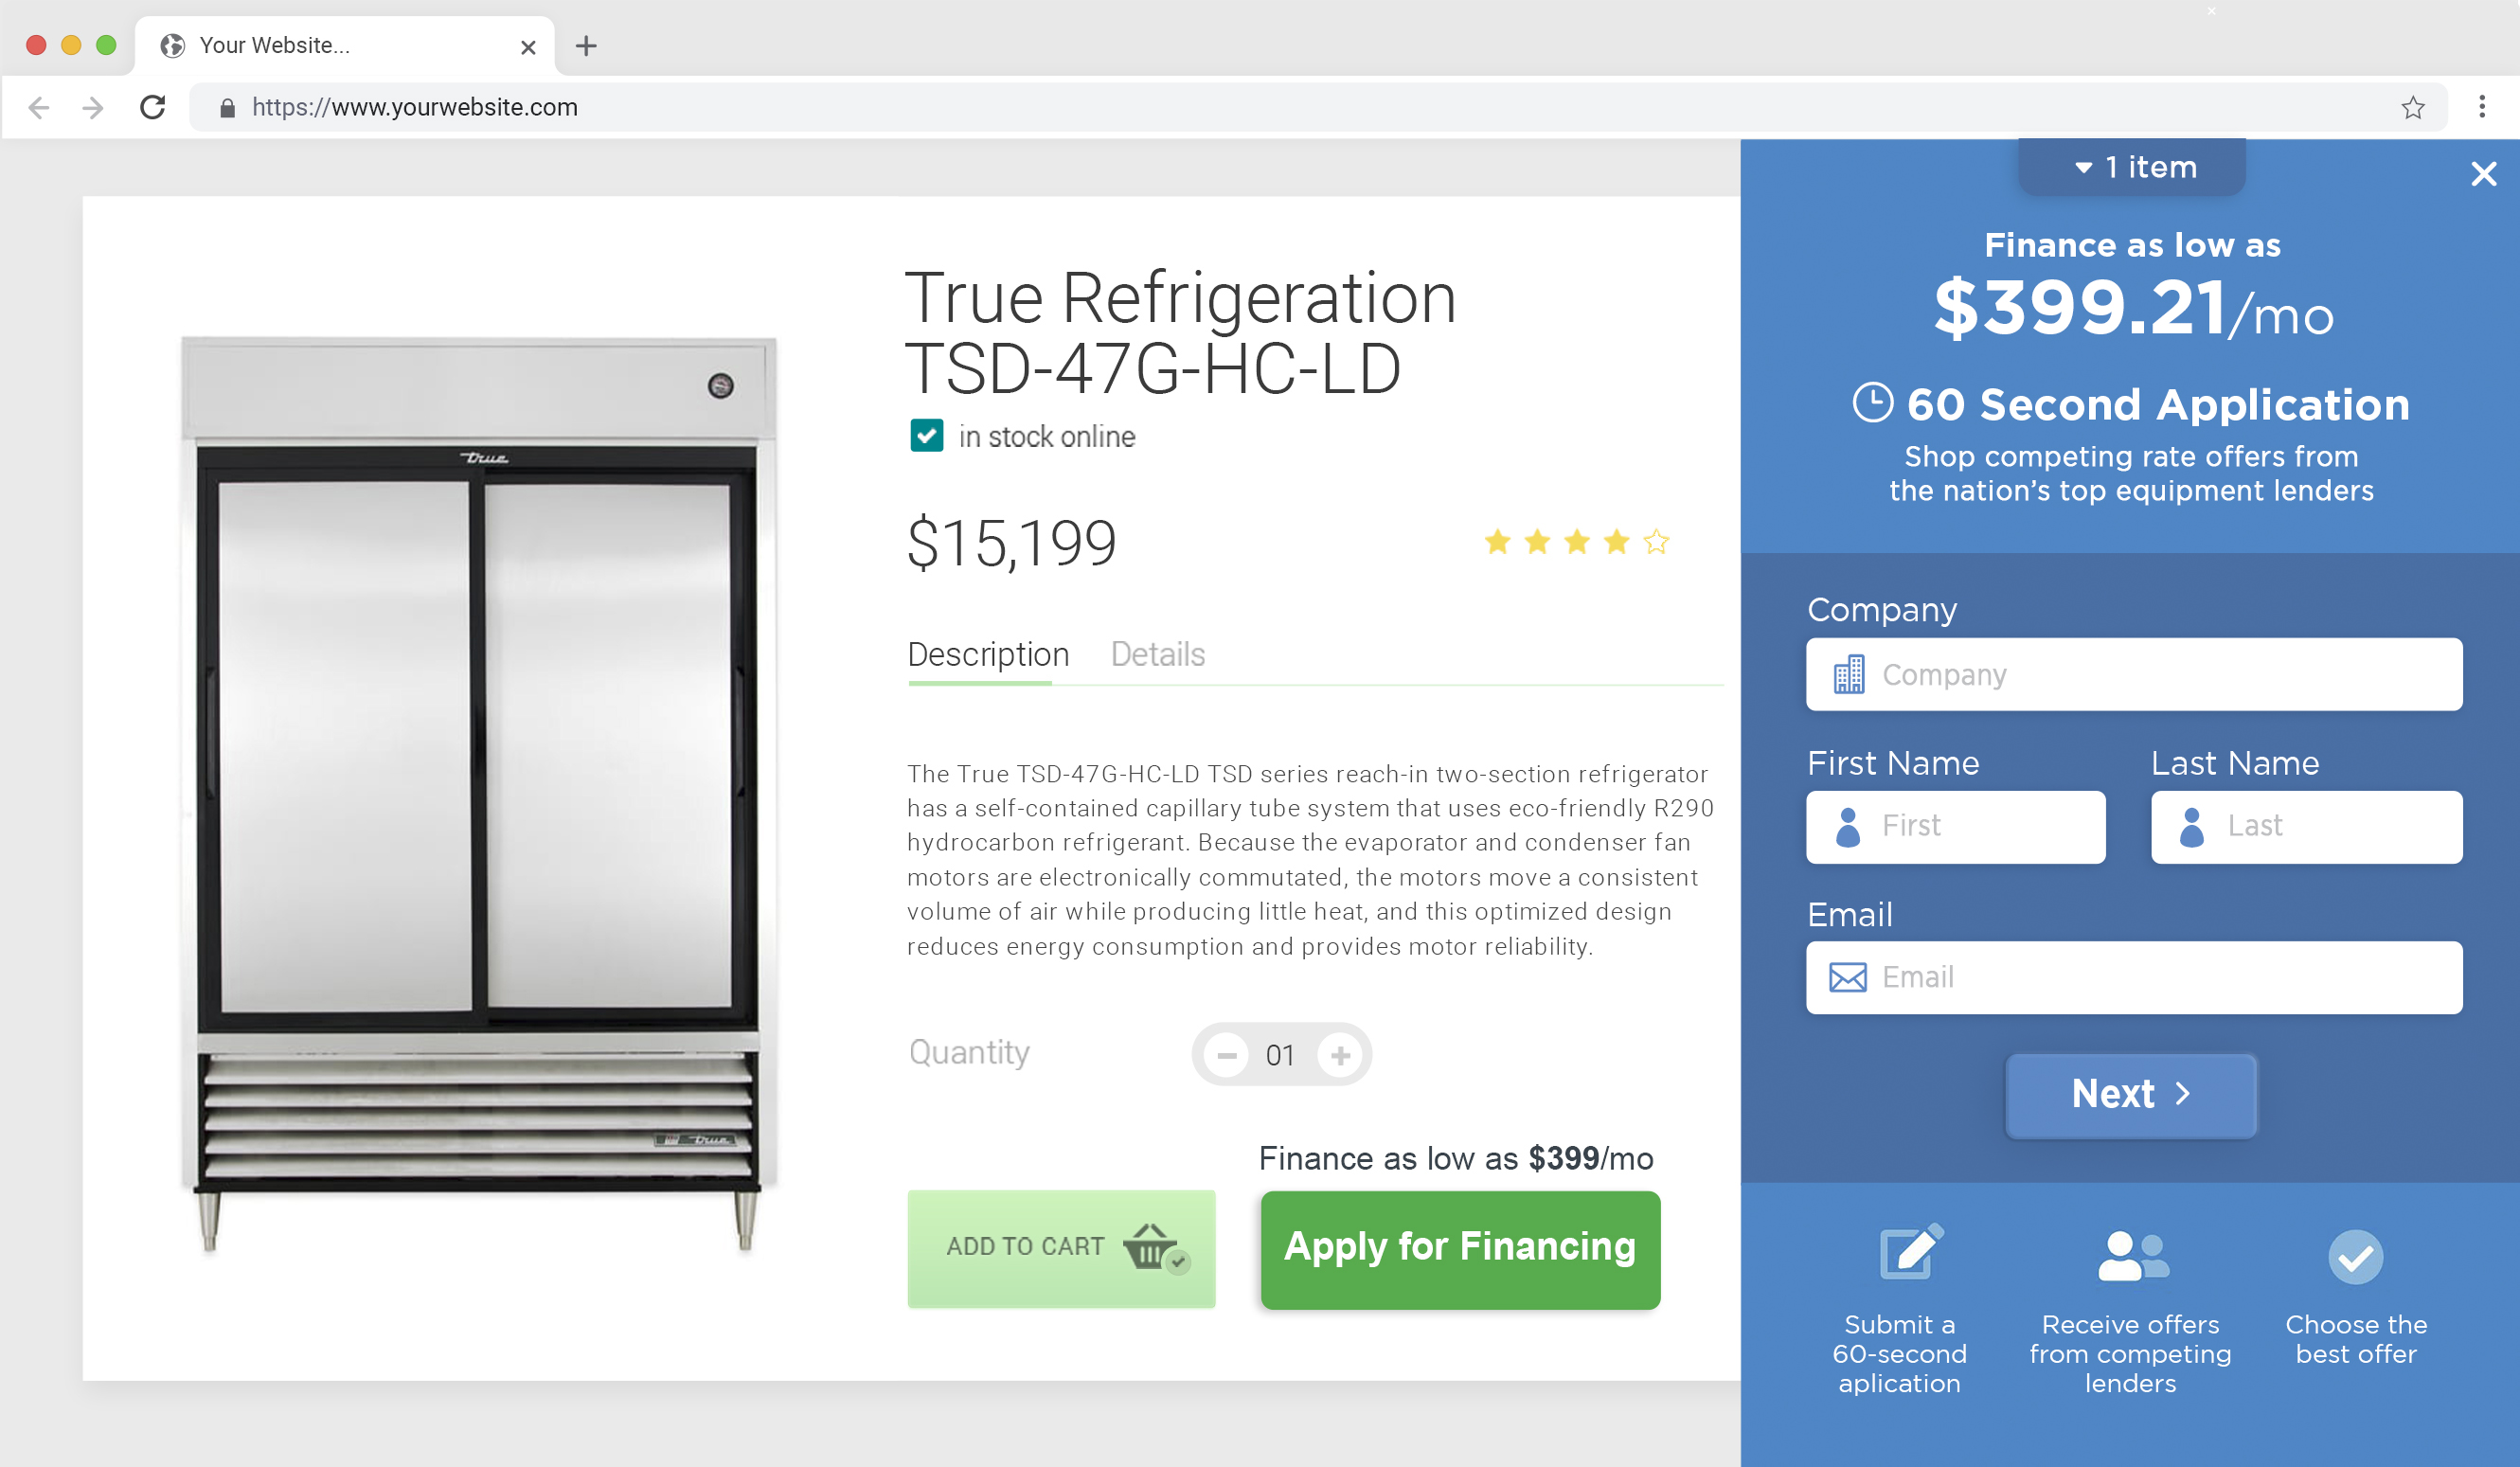
APPROVE installing on your Website
APPROVE has developed a simple methodology to offer financing options on your website without having to customize the code that publishes your web pages. How it works:
-
Install the APPROVE script - The APPROVE Plugin code is what loads and enables all APPROVE function throughout the website. To access you account specific APPROVE Plugin script, login to your account and go to APPROVE Settings > Web Integration > Embedded Application. This script can be placed anywhere in the body of your website pages.
Example APPROVE Plugin Code
<script> window.kwipped_approve = window.kwipped_approve || {}; window.kwipped_approve.url = "https://www.kwipped.com"; window.kwipped_approve.approve_id = "your+approve+id+goes+here"; </script> <script src="https://api.kwipped.com/approve/plugin/3.0/approve_plugin_loader.php"></script> <approve-widget></approve-widget> -
APPROVE Creates Custom Button Instructions - Once the APPROVE Script is live, our development team will write instructions specific to your website to a) find the information on your webpage we need for finance and b) determine where to place financing options.
-
If Your Website Doesn't Have Public Pricing - APPROVE can still provide a financing option. To do this, we need a meta tag added to the each equipment webpage that provide equipment pricing. Example:
<meta name="approve_price" content="12000">
Installing APPROVE on your Website
Below are step-by-step instructions for adding APPROVE to your website.
Step 1: Style Your Finance Applications
APPROVE provides complete control over the styling of your online finance applications. To customize the colors and fonts of you plugin, login to your account and go to APPROVE Settings > Web Integration > Embedded Application.
{info} If you are chooosing to use the Hosted Application instead of the Embedded Application, login to your account and go to APPROVE Settings > Web Integration > Hosted Application to customize the logo, colors, and fonts.
Step 2: Configure Your APPROVE Plugin Settings
There are several additional account level settings found at APPROVE Settings > Web Integration > General. These include:
- Auto Submission - When checked, finance applications will be automatically submitted to the APPROVE Lender Network. If you uncheck, you will be able to review the applications first and submit them manually.
- Hide Item Prices - When checked, the items added to the cart will not show the prices or totals. The estimated per month will still be shown.
- Hide Finance Teaser Rate - When checked, the estimated per month finance teaser amount will not show.
- Bypass Verification Password - This feature allows you to set up a password for internal sales people so that they can complete finance applications on behalf of customers from your website without requiring customer email vertification.
- Button Amount Threshold - This determines the product price threshold for financing. For any products at or below this amount, APPROVE buttons and teaser rates will not display. The current minimum for equipment financing is $2,000.
- Cart Amount Threshold - This determines the product price threshold for financing in the shopping cart. For any total cart values at or below this amount, APPROVE buttons and teaser rates will not display. The current minimum for equipment financing is $2,000.
- Require Guarantor Threshhold - This determines how many years in business an applicant is before they are required to submit a personal guarantor. By default guarantors will be required for any business less than 3 years.
*{warning} Be sure to discuss these settings with your APPROVE account manager to ensure your account is optimized for your industry, equipment, and customer profile.
Step 3: Installing the APPROVE Plugin
The APPROVE Plugin code is what loads and enables all APPROVE function throughout the website. To access you account secific APPROVE Plugin script, login to your account and go to APPROVE Settings > Web Integration > Embedded Application.
Example APPROVE Plugin Code
<script> window.kwipped_approve = window.kwipped_approve || {}; window.kwipped_approve.url = "https://www.kwipped.com";
window.kwipped_approve.approve_id = "your+approve+id+goes+here"; </script>
<script src="https://api.kwipped.com/approve/plugin/3.0/approve_plugin_loader.php"></script>
<approve-widget></approve-widget>- This code should be placed in your website's
<body></body>tag. - You can also retrieve your
approveidby logging in to your account and go to APPROVE Settings > Web Integration > General.
Step 4: Adding "Apply for Financing" Button tags
Next step is to implement buttons on your product pages and shopping cart that offer a financing option for your customers. APPROVE button tags enable you to create buttons on your website that interact with your APPROVE Finance Application. These tags can be placed in any button giving you complete control over button location and styling.
Button Tag Overview - Single Item
For use on product pages and product list pages.
<button
  type="button"
  approve-function="[application_type]"
  approve-action="[action_type]"
  approve-model="[model]"
  approve-qty="[quantity]"
  approve-price="[price]"
  approve-item-type="[type]"
  style="display: none"
>Apply For Financing</button>
Button Tag Overview - Multiple Items
For use in shopping carts and product pages where you wish to seperate additional items (i.e. accessories).
<button
  type="button"
  approve-function="[application_type]"
  approve-action="[action_type]"
  approve-items='[
    { "model":"[model1]", "price":"[price1]", "quantity":"[quantity1]", "type": "[type1]"},
    { "model":"[model2]", "price":"[price2]", "quantity":"[quantity2]", "type": "[type2]"},
  ]'
  style="display: none"
>Apply For Financing</button>
{info} You can assign any class and style elements to your buttons to match your website. Be sure to add the
style="display:noneto your buttons by default. This will ensure only buttons for products above your pricing threshold settings will appear.
Tag Properties Defined
| Tag Properties | Description |
|---|---|
approve-function |
Defines the APPROVE function associated with the button |
approve-action |
Defines the APPROVE action taken when user activates button |
approve-model |
Used with add_to_app to add product model information into finance application |
approve-qty |
Used with add_to_app to add quantity information into finance application |
approve-price |
Used with add_to_app to add price information into finance application |
approve-item-type |
Used with add_to_app to add product type information into finance application |
Property Values Defined
| Property Values | Options/Format |
|---|---|
[application-type] |
embedded_app - Will enable the embedded application function hosted_app - Will enable the hosted application function |
[action-type] |
add_to_app - Adds product information to applicationopen_app - Opens embedded application on webpage close_app - Closes embedded application on webpage clear_items - Removes all product information from application |
[model] |
Ideal format is "Make + Model + Name" (e.g. Ford F100 White Truck w/ Extended Cab). This is most commonly found in whatever data field populates the title tag and/or H1 tag on a product page. |
[quantity] |
Integer (e.g. 2) |
[price] |
Float (e.g. 10000.99). Supports USD currency only. |
[type] |
Values supported include new_product, used_product, refurbished_product, service, fee, shipping, or discount |
Example Single-Item Button with Teaser Rate Tag
The example below demonstrates a button that would add a New white Ford F150 Truck for $30,000 to an embedded application. The button also includes the approve-function="teaser_rate" tag so the button can show the potential monthly rate.
<button
  type="button"
  approve-function="embedded_app"
  approve-action="add_to_app"
  approve-model="Ford F150 White Truck"
  approve-qty="1"
  approve-price="30000.00"
  approve-item-type="new_product"
  style="display: none"
>
As low as <span
  approve-function="teaser_rate"
  approve-total="30000.00"
></span>/month. Click to Apply For Financing</button>
Example Multiple-Item Button with Teaser Rate Tag
The example below demonstrates a button that would add a New white Ford F150 Truck for $30,000 to an embedded application plus an additional $1,000 shipping fee. The approve-function="teaser_rate" amount is the sum of all the items in the button.
<button
  type="button"
  approve-function="embedded_app"
  approve-action="add_to_app"
    approve-items='[
    { "model":"Ford F150 White Truck", "price":"30000", "quantity":"1", "type": "new_product"},
    { "model":"Shipping", "price":"1000", "quantity":"1", "type": "shipping"},
  ]'
  style="display: none"
>
As low as <span
  approve-function="teaser_rate"
  approve-total="31000.00"
></span>/month. Click to Apply For Financing</button>
Step 5: Add additional "As Low As" Teaser Rate tags (Optional)
You may also want to provide Teaser Rates ("As low as $254/mo") in text on your product pages and shopping cart. The teaser rate tag allows you to pass pricing information to APPROVE and receive a teaser rate to be placed anywhere on your website.
Input
<span
  approve-function="teaser_rate"
  approve-total="10000.00"
></span>
Output
Example:
Input
<div>As low as $<span
  approve-function="teaser_rate"
  approve-total="10000.00"
></span>/month. Click to Apply</div>
Output
Hide_Below_Total Function
The hide_below_total APPROVE function allows you to hide any content within a <div> or <span> based on if the approve-total does not meet the amount threshold in your settings. This is typically used when placing a teaser_rate in text somewhere on the page.
Input
<div
  approve-function="hide_below_total"
  approve-total="3000"
  style="display: none">
  As low as $<span
  approve-function="teaser_rate"
  approve-total="3000.00"
></span>/month. Click to Apply</div>
If your amount threshold was set to $2,000, this would be the output:
Output
If your amount threshold was set to $5,000, no content would appear.