APPROVE for Magento 2
- Magento 2 Overview
- Magento 2 Theme Integration Details
- Magento 2 Module Integration Details
- Magento 2 Custom Integration Details
Magento 2 Overview
Integrating APPROVE into your Magento 2 site is easy. We have options created to cater to every level of expertise, and every business size. The following table will help you choose the right Magento 2 integration solution for your business.
| Magento 2 Solution | Technical Level | Integration Into Your Site | Requirements |
|---|---|---|---|
| Magento 2 Theme Creation/Editing Integration | Familiarity with Magento 2 theme editing and depoloyment and basic Magento CLI understanding and access is needed | ||
| Magento 2 Module Integration | Familiarity with basic Magento 2 module installation or basic Magento CLI understanding and access is needed | ||
| Custom (We create a solution specifically for you) | Contact KWIPPED for a quote |
Magento 2 Theme Integration Details
{warning} The Magento 2 theme integration details are in development and will be released soon. You must have a solid understanding of Magento 2 Theme development to integrate the APPROVE plugin. (https://github.com/KWIPPED/approve-magento-plugin)
Magento 2 Module Integration Details
The steps needed to integrate our custom module in Magento 2 are summed up below.
- Download the
Approve_Equipmentfinance-Magento-2-module.zipfile - Extract
Approve_Equipmentfinance-Magento-2-module.zipfiles - Install Module
Approve_Equipmentfinanceinto Magento 2 - Configure settings as needed
- Done.
STEP 1: Download the Approve_Equipmentfinance-Magento-2-module.zip file
Download the file
To do so:
click on the file link or navigate to the dist folder, right click on the file approve-plugin.js and select Save as to save it locally
STEP 2: Extract Approve_Equipmentfinance-Magento-2-module.zip files
Using an archive program for your OS extract all of the files and folders in Approve_Equipmentfinance-Magento-2-module.zip into your Magento 2 system and place in the app/code/ directory.
The folder structure of the extracted files when you are complete should be
+--{Magento 2 Installation Directory}/app/code/
|   +-- Approve/
|   |   +--Equipmentfinance/
|   |   |   +--Block/
|   |   |   │   +--Cart/
|   |   |   │   +--Catalog/
|   |   |   │   |   +--Product/
|   |   |   +--etc
|   |   |   │   +--adminhtml
|   |   |   +--Helper
|   |   |   +--Plugin
|   |   |   │   +--Block
|   |   |   │   |   +--Product
|   |   |   +--view
|   |   |   |   +--frontend
|   |   |   |   |   +--layout
|   |   |   |   |   +--templates
|   |   |   |   |   │   +--cart
|   |   |   |   |   │   +--catalog
|   |   |   |   |   │   |   +--product
|   |   |   |   |   +--web
|   |   |   |   |   |   +--css
|   |   |   |   |   |   │   +--source
|   |   |   |   |   |   +--js
STEP 3: Install Module Approve_Equipmentfinance into Magento 2
Using the Web Setup Wizard
- GoTo:
SYSTEM->Web Setup Wizard->Module Manager - Looking under the
Module Namecolumn, find the module namedApprove_Equipmentfinance - click
Select->Enable - Walk through the rediness check and installation till it is complete.
Using the CLI
-
In your terminal when in the root of your Magento 2 Installation Directory
-
Enable the module by running the following command
user@host:MagentoDir$ php bin/magento module:enable Approve_Equipmentfinance -
Update the system to use the new module
user@host:MagentoDir$ php bin/magento setup:upgrade -
Compile Code (if needed)
user@host:MagentoDir$ php bin/magento setup:di:compile -
Flush Cache (if needed)
user@host:MagentoDir$ php bin/magento cache:flush
When these steps are completed you be able to navigate to the new module settings page by going to
STORES->Configuration Look for the tab named APPROVE EQUIPMENT FINANCE
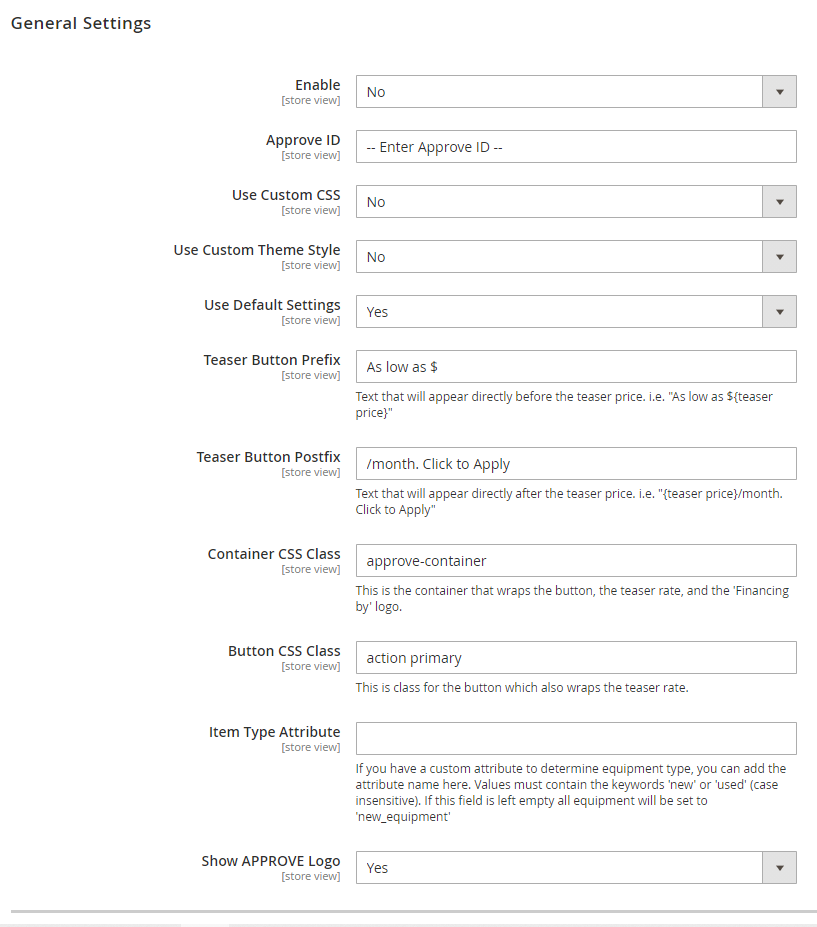
STEP 4: Configure settings as needed
Navigate to the APPROVE EQUIPMENT FINANCE tab in the store settings by going to STORES->Configuration
The default settings should appear like the following screenshot:
- Place the APPROVE finance plugin initialization snippet in the Magento 2 theme body file
Layout/theme.liquidright before the closing</body>tag. - Replace the text
-- Enter Approve ID --with your APPROVE ID. This can be found in your online account underSettings->APPROVE Settings->Web Integration->General - Under the option
EnableselectYes - Save your configuration changes
- Navigate to
SYSTEM->Cache Managementand refresh your cache.
At this point you should see the approve finance buttons on the product catalog, product display page, and cart.
-
If you want to customize the css used for the module you can change the option for
Use Custom CSStoYes. When set toYesyou will see a text field that will allow you to add custom css rules to your system which will be used when the module is loaded. -
If you want to customize JSON Theme style of the plugin you can change the option for
Use Custom Theme StyletoYes. When set toYesyou will see a text field that will allow you to add custom JSON rules to your system which will be used when the module is loaded. To see an example of the json that is used you can see it in your APPROVE account underSettings->APPROVE Settings->Embeded Applicationinside of the generated tag when you change the theme style. The JSON code will be similar to the example below:
{
    "bgcolor":'#777777',
    "header_font":{
        "fontFamily":"",
        "fontWeight":"",
        "fontStyle":""
    },
    "inner_bgcolor":'#ebebeb',
    "button_bgcolor":'#777777',
    "button_border_color":'#ebebeb',
    "button_text_color":'#FFFFFF',
    "button_font":{
        "fontFamily":"",
        "fontWeight":"",
        "fontStyle":""
    },
    "maintext_font":{
        "fontFamily":"",
        "fontWeight":"",
        "fontStyle":""
    },
    "maintext_color":'#777777',
    "headertext_color":"white"
}- If you want to customize which buttons are shown you can change the option for
Use Default SettingstoYes. When set toYesyou will see more options below the general settings that will allow you to enable/disable each of the buttons and have custom css classes.